User Tools

Site Tools


ashitav2:how_to_install

How To Install Ashita v2

Before you begin installing Ashita v2, you should first make sure that you have met the current system requirements.

1. Downloading Ashita v2

To begin, you can download the main Ashita v2 executable from the following link:
http://delvl.ffevo.net/atom0s/launcher-v2/raw/master/Ashita.exe


2. Installing Ashita v2

Ashita v2 does not have a typical installer. Instead, the file downloaded above is the launcher and updater. It will download all the appropriate files needed for Ashita to run properly. Because of this, it is highly encouraged to place this file inside of a new folder somewhere on your system.

Some recommended locations would be:

  • C:\Ashita\Ashita.exe
  • C:\Users\<Your Name>\Desktop\Ashita\Ashita.exe

It is not recommended to place Ashita.exe anywhere other files reside. It is also not recommended to place the Ashita.exe inside of your FFXI install folder or anywhere inside of Program Files or Program Files (x86) on your system. Doing so can cause permission issues which can lead to Ashita not working properly on some machines.


3. Running Ashita v2

Once you have met the system requirements and are ready to begin, simply launch Ashita v2.

You may need to run Ashita v2 as an administrator in order for it to work properly!
To do that, simply right-click Ashita.exe and choose 'Run As Administrator'.

If all goes well you should now see Ashita downloading the needed files for it to operate.

Once the downloads have completed your Ashita launcher should now look like this:


4. Working With The Ashita Launcher

Next you are ready to start using Ashita. The following screenshots and information will better help you understand the layout of the launcher.
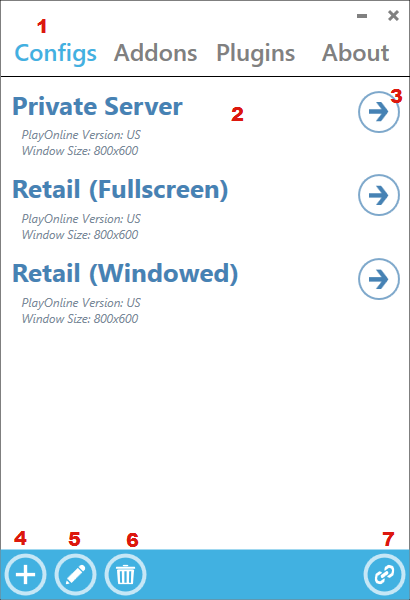
Main Configuration Pages

First Image

  1. The launcher navigation. Clicking on these will change the current page being viewed.
  2. The current found configuration files.
  3. The launch button to start playing with the given configuration file.
  4. Add new configuration button.
  5. Edit currently selected configuration button.
  6. Delete currently selected configuration button.
  7. Creates a short-cut link on the desktop of the currently selected configuration.

Second Image (Accessed when you either add a new configuration or edit an existing one.)

  1. The configurations name, clicking on it allows you to edit it as plain text.
  2. The configuration navigation, allowing you to switch between certain config menus.
  3. The resource language to use within Ashita.
  4. The logging level that Ashita will use when it produces its log files.
  5. Misc Settings
    1. Auto-close Launcher? - Will automatically close the launcher when the current configuration is loaded.
  6. Boot Settings
    1. Boot File - The file to launch when starting beginning to play. Leave blank to automatically locate the retail pol.exe.
    2. Boot Command - The command to pass to the boot file.
    3. Startup Script - The script to execute once Ashita loads. (Usually just Default.txt, scripts are found in the \Ashita\Scripts\ folder.)
  7. The confirm button to save the current configuration.

Third Image (Accessed when you click on the window navigation link under the configuration editor.)

  1. The POL language to use for locating the installation of FFXI.
  2. Misc Settings
    1. Test Server - If enabled, Ashita will attempt to locate and use a test server installation.
    2. Window Mode - If enabled, Ashita will launch in a window. Fullscreen if disabled.
    3. Show Border - If enabled, will keep the window border present while playing.
    4. Unhook Mouse - If enabled, prevents the game from 'snapping' the mouse into place.
  3. Resolutions
    1. Window - The window resolution to play the game at.
    2. Startup - The startup position of where the game should launch, if windowed. (If both values are -1 it will start center screen.)
    3. Background - The background resolution of FFXI. (If values are -1, they will use the current value found in the registry.)
    4. Menu - The menu resolution of FFXI. (If values are -1, they will use the current value found in the registry.)
  4. Advanced Settings
    1. Direct3D Buffer Count - The number of buffers to use with the device.
      • Default: 1
      • Recommended: 1
    2. Direct3D Swap Effect - The swap effect to use with the device.
      • Default: 1
      • Recommended: 1
      • Valid Values:
        • 0 - Will be treated as 1 (Discard).
        • 1 - Will enable Discard (default).
        • 2 - Will enable Flip.
        • 3 - Will enable Copy. (Requires the buffer count to be 1!)
        • 4 - Will enable Copy VSYNC. (Requires the buffer count to be 1!)

Addons / Plugins Pages

  1. The addon / plugin name.
  2. The addon / plugin description.
  3. The addon / plugin installed state. If installed the green text will show, otherwise a download button appears.
  4. The addon / plugin home and bug report links.
  5. The addon / plugin download button to install the given feature.

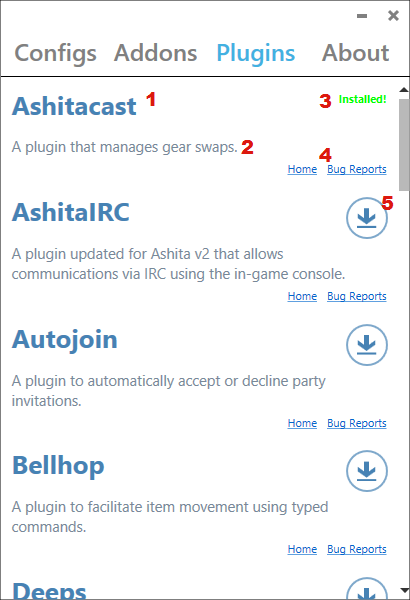
Note: Downloading an addon or plugin DOES NOT automatically make it load when Ashita starts! You must edit your startup scripts in order for that to happen.

ashitav2/how_to_install.txt · Last modified: 2015/11/20 11:35 by atom0s